Appearance
PfSense Firewall
pfSense is an open-source firewall/router based on FreeBSD, suitable for a wide range of use cases. It can run on various hardware platforms and virtual machines. This guide will walk you through setting up traffic routing via a Tillered Entry Node on your network using pfSense.
Prerequisites
- Network Setup: Ensure your pfSense setup includes multiple interfaces/VLANs for isolated networks.
- DMZ: Create an isolated network for the Tillered Entry Node and configure the DHCP server to assign reserved DHCP leases for Tillered IP addresses.
- Tillered Entry Node: Deploy a Tillered Entry Node on the DMZ or a similar isolated network with DHCP leases.
In our example network, we have a LAN and a DMZ network, with the Tillered Entry Node on the DMZ. We aim to route all LAN traffic via the Tillered interface; your setup may vary based on your specific requirements.
IMPORTANT
The IP addresses and network configurations provided in this guide are for illustrative purposes only. Please use the specific IP addresses and configurations relevant to your network and Tillered nodes.
The following are the firewall rules in our example network; your setup may have stricter rules:
| Interface | Src | Dest | Type | Action |
|---|---|---|---|---|
LAN | LAN net | any | any | PASS |
DMZ | DMZ net | any | any | PASS |
DMZ | DMZ net | LAN net | any | DROP |
LAN | LAN net | DMZ net | tcp | PASS |
LAN | LAN net | DMZ net | udp | PASS |
LAN | LAN net | DMZ net | icmp | PASS |
Adding Tillered Entry Interface as a Gateway
A Tillered Entry Node has multiple IP addresses, each assigned by your DMZ's DHCP server, corresponding to virtual interfaces linked to their respective exit nodes. You can view these interface IPs in the Tillered Hub under the details of the Entry Node. For example:

IMPORTANT
The IP addresses and node names shown here are examples. Be sure to use the actual IP addresses and node names from your Tillered Hub configuration.
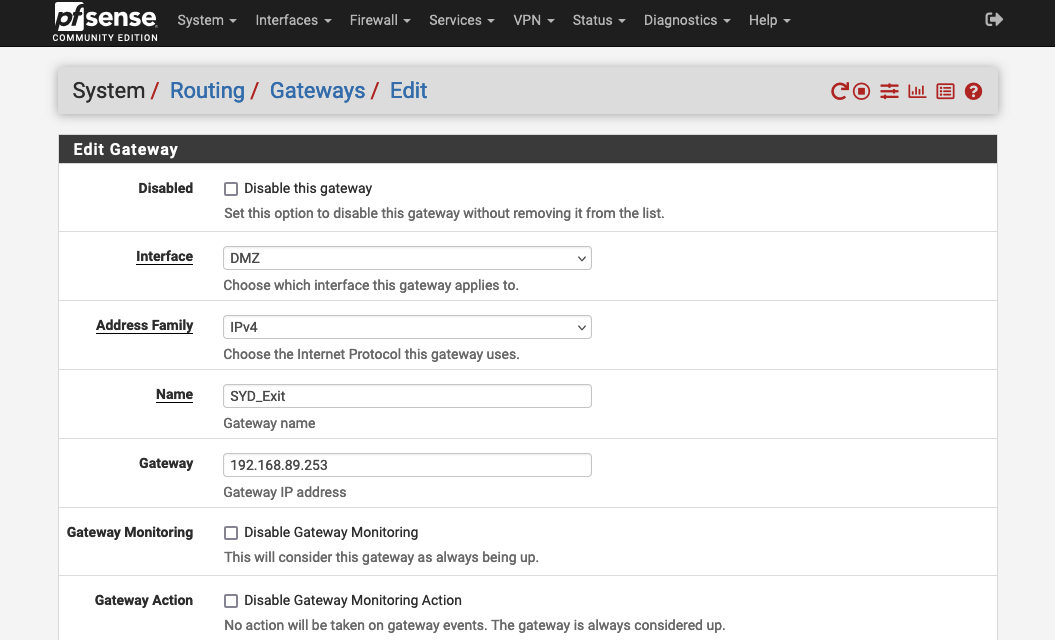
In our example we have an Exit Node in Sydney (SYD Exit) with the ip of 192.168.89.253 on our DMZ. To utilise this tunnel with pfSense we need to create a new gateway:
- In the pfSense web interface, go to
System > Routing > Gateways. - Add a New Gateway:
- Select the Interface the Entry Node is on (e.g.,
DMZ). - Name the Gateway, ideally using a location code. We named ours
SYD_Exitas it links to the Sydney exit node. - Enter the IP of the Entry Node Interface.
- Select the Interface the Entry Node is on (e.g.,
- Save and Apply the New Network Changes.

Add Routing Rule
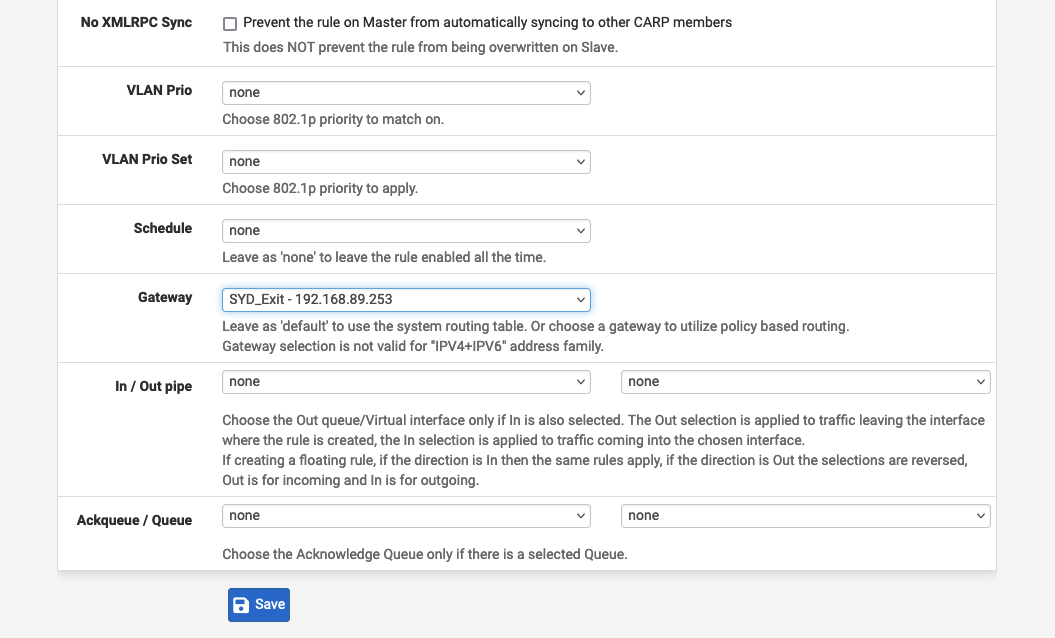
To route all traffic on the LAN interface via our Tillered Entry Node (SYD Exit), add a rule matching all traffic on the LAN interface and set the Gateway to SYD_Exit, the gateway created earlier. Your naming and settings may vary based on your use case.
NOTE
Ensure that the routing rules you set align with your network policies and requirements. The examples provided are generic and should be tailored to your specific network environment.
- Navigate to the
Firewall > Rulessection and select the LAN interface (or the target interface). - Add a new rule at the bottom, ensuring it matches all traffic. Set the protocol to
TCP. You may choose to route specific traffic instead. - In the "Extra Options" area, click "Display Advanced". Scroll down to "Gateway" and set it to the previously created Gateway (
SYD_Exitin our case). - Save and "Apply Changes" to finalise the new configuration.

This setup will route the specified traffic through the Tillered Entry Node, optimising network performance and data transfer efficiency.